家具卖家不一定要等完整棚拍,才开始做高级房间场景图。只要现场照片保留了清晰轮廓、关键材质和可信比例,就可以先把产品主体处理干净,再生成适合商品页和广告使用的空间画面。
很多团队手里已经有照片,只是那些照片还不够“会卖货”。可能是一张展厅里的手机照,一张仓库里的样品照,一张采购现场拍下来的供应商图,或者门店临时拍的上新素材。它们记录了真实产品,却也带着现场环境的限制:背景杂、灯光乱、空间不高级,甚至让产品看起来比实际便宜。

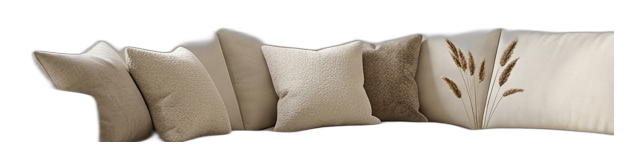
上图这类素材的价值在于:产品主体已经足够清楚。它不代表最终广告图,但可以作为后续场景生成的起点。
先定义问题:现场照要变成可销售的房间图
家具现场照通常解决了“我有这个产品”的问题,却没有解决“用户为什么愿意点开、比较、收藏或咨询”的问题。高级房间场景图要解决的是第二个问题。
它不是简单换一个漂亮背景,而是让用户更快理解:
- 这件家具放进真实空间后是什么感觉
- 产品的比例和风格是否适合家庭或商业空间
- 材质、软硬感、体量是否值得进一步查看
- 这张图能否放在商品页、广告图或上新内容里
所以,现场照转场景图的关键,不是把原图“修得很好看”,而是先判断它能不能支撑一个可信的商业画面。
现场照是否可用,先看三个基础条件
不要先看背景漂不漂亮。先看产品信息有没有留下来。
一张现场家具照如果想继续生成高级房间场景,至少需要满足三件事:
- 主体轮廓清楚,边缘没有大面积丢失
- 材质和主要卖点仍然可判断
- 分辨率和拍摄角度能支撑后续放大查看
这张图的重点不是“背景已经干净”,而是沙发的扶手、坐垫、靠背和整体比例还能被稳定识别。对家具图来说,产品事实比空间氛围更早决定结果上限。
如果现场照已经糊到看不清边缘,或者产品被遮挡到结构不完整,后续生成再高级,也可能只是把错误包装得更好看。
现场拍摄时应该优先保留什么
门店、展厅、仓库和样品间通常没有理想拍摄条件。你不需要在现场完成最终视觉,但要尽量带回一张“可处理”的源图。
建议现场拍摄时优先做这些事:
- 找到相对干净的光线,避免强烈背光和大面积阴影
- 尽量避开极端广角,减少沙发、桌子、柜体的比例变形
- 让镜头高度接近用户自然观看家具的高度
- 尽量让产品和背景杂物分开
- 多拍一两个安全角度,避免唯一素材不可用
- 不要裁掉椅腿、桌脚、扶手、柜体边角等关键结构
现场的目标不是拍出完美大片,而是保留足够清楚的产品事实。后面的场景生成、风格调整和多图延展,都要建立在这个基础上。
从现场照到高级房间图的推荐路径
最快的流程不是一次生成很多图,而是按顺序把风险降下来。
1. 先把产品从原环境中整理出来
展厅地面、仓库墙面、门店灯光和样品间杂物,都不一定适合成为最终销售画面。第一步应该先确认产品主体是否干净、完整、可识别。
如果产品边缘不稳,后面的房间场景也会不稳。沙发会像漂在空间里,椅腿会被背景吞掉,桌面边缘会显得不可信。
这类中间结果适合用来检查问题:哪里边缘变软,哪里背景残留,哪里产品结构可能被误删。不要急着进入最终场景,先把主体可信度看清楚。
2. 先锁定一个房间方向
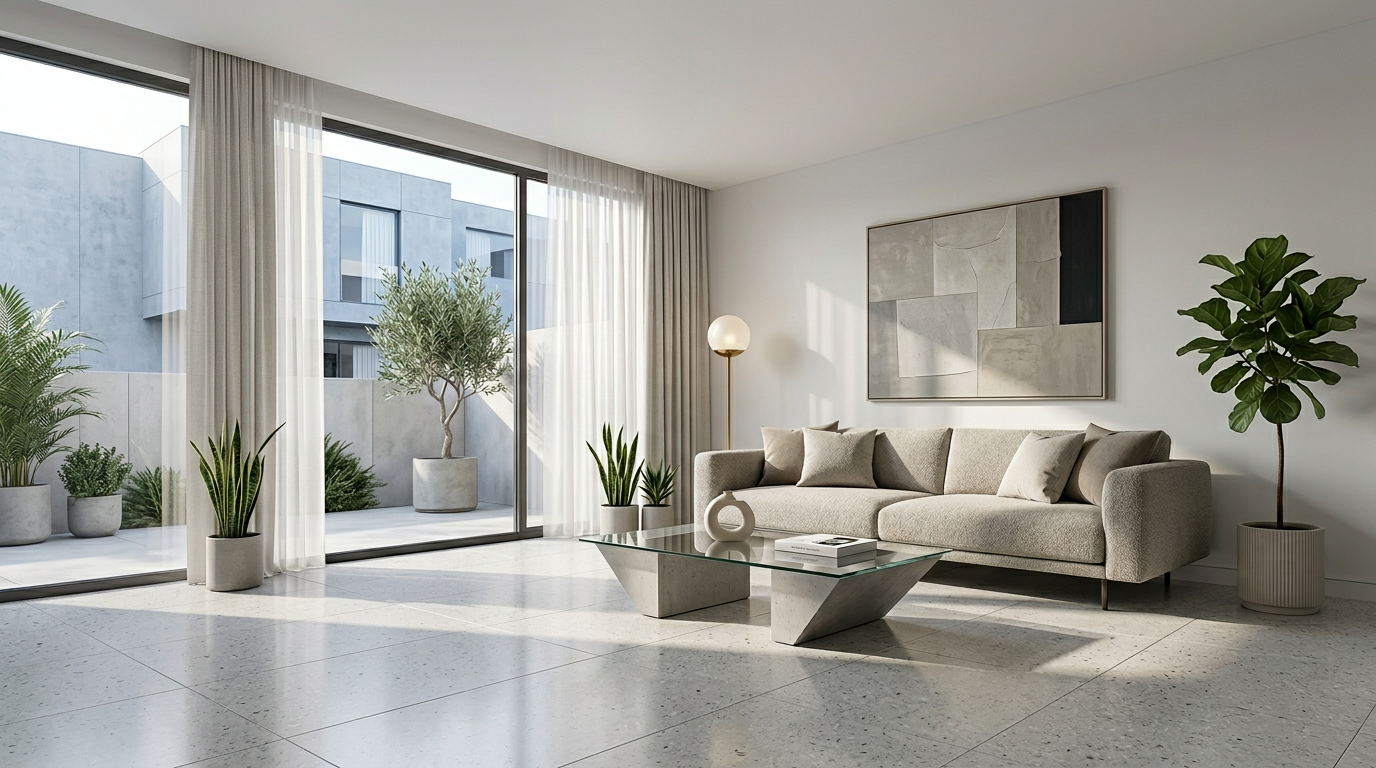
不要一开始就生成很多随机风格。家具场景图需要服务具体销售目的。
可以先按目标用户选择一个主方向:
- 面向家庭用户:明亮、真实、可居住的客厅或卧室
- 面向高端产品:更克制的酒店感、样板间感或精品空间
- 面向电商上新:干净、通用、容易放进商品页的明亮空间
- 面向广告测试:更有视觉冲击,但仍然保留产品主体
先把第一张主图方向做稳,再考虑更多变化。
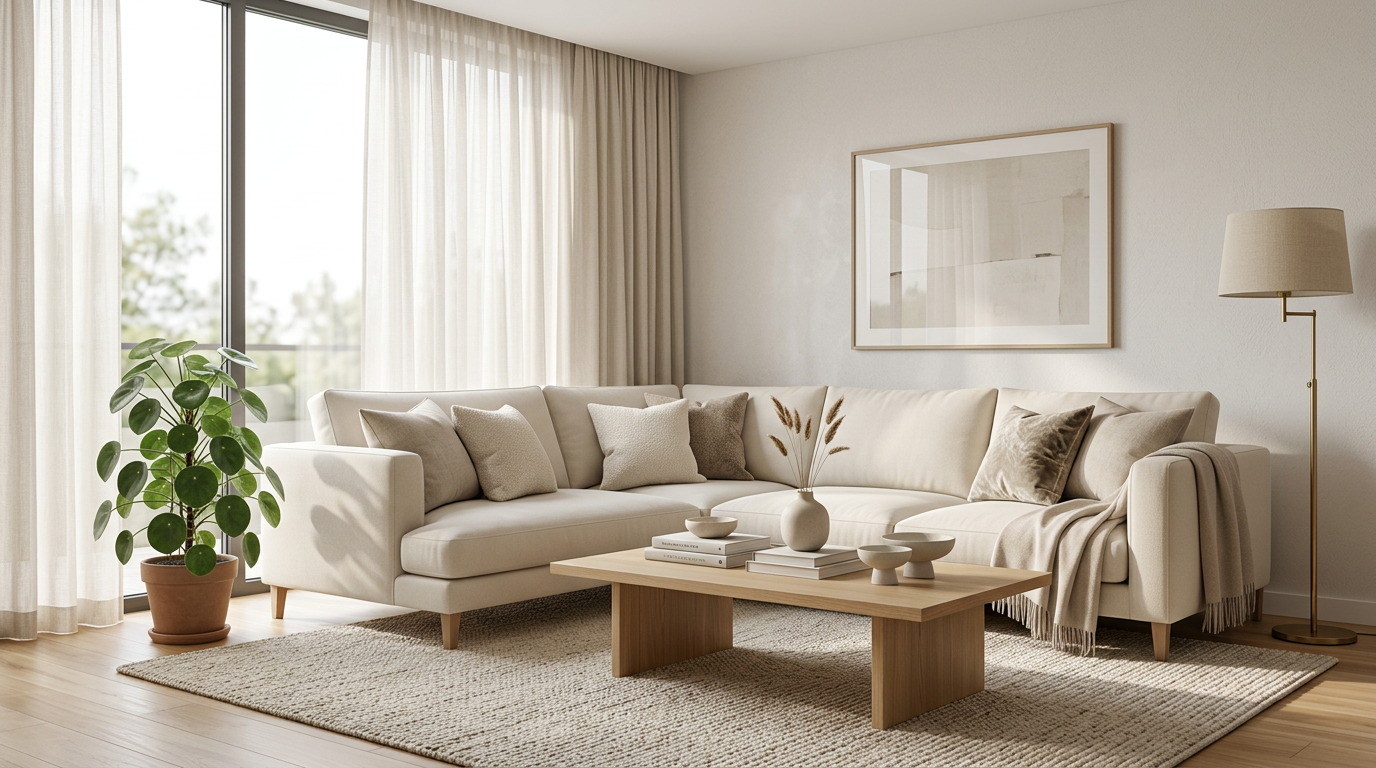
这类画面适合做第一轮判断:空间是否高级,产品是否仍然是主角,比例是否自然,用户是否能理解这件家具的使用场景。
3. 修好一张,再延展多张
很多团队失败在这里:看到第一张还不错,就立刻生成十张不同风格。结果每一张都有小问题,产品身份也开始漂移。
更稳的做法是先修好一张代表方向:
- 边缘是否干净
- 阴影是否自然落地
- 布料、木纹或金属质感是否保留
- 产品颜色是否没有被场景带偏
- 房间风格是否符合品牌定位
当主图成立后,再延展支持图会更稳。比如局部细节图、不同构图版本、社媒竖图、广告图或商品页第二屏素材。
判断清单:这张现场照值得继续做吗
进入正式生成前,可以按这 8 条快速判断:
- 产品主体是否一眼能看清
- 外轮廓是否没有大面积缺失
- 扶手、椅腿、桌脚、柜体边角等结构是否完整
- 材质和主要卖点是否仍然可判断
- 拍摄角度是否支持真实摆放
- 产品比例是否没有明显变形
- 原图分辨率是否能支持商品页查看
- 这张图是否对应明确用途,例如主图、广告图、详情页辅助图或上新素材
如果大多数答案是“是”,这张现场照通常值得先做一版场景测试。如果多个答案是否定,换一张源图可能比继续修补更省时间。
适用场景
这种流程适合以下情况:
- 家具卖家已有展厅、仓库、门店或供应商产品照
- 产品主体完整,但原背景不适合直接销售
- 需要快速为上新、广告或商品页补充场景图
- 不想为每个 SKU 都安排完整棚拍
- 需要先验证某个房间风格是否适合产品
- 产品已经在手里,但缺少高级视觉表达
它尤其适合“照片有用,但不够高级”的情况。也就是产品事实已经存在,只是还没有被放进更合适的空间叙事里。
不适用场景
以下情况不建议硬做:
- 产品主体被大面积遮挡
- 关键结构被裁掉,例如椅腿、扶手、桌脚或柜体底部
- 原图过糊,材质和边缘都不可判断
- 广角变形严重,产品比例已经不可信
- 需要严格展示结构尺寸,但源图不准确
- 想让 AI 凭空补出一个原图里不存在的产品细节
如果这些问题存在,先重新拍一张基础产品图,通常比不断修复更可靠。
常见失败原因
第一种失败,是把问题理解成“背景不好看”。背景可以换,但产品边缘、材质和比例如果已经丢失,换背景不能真正解决。
第二种失败,是一开始就追求高级空间。空间越高级,产品错误反而越明显。用户会看到漂亮房间,也会看到不自然的家具边缘。
第三种失败,是没有先锁定用途。商品页主图、广告图、社媒图和详情页辅助图,对构图和信息密度的要求不一样。
第四种失败,是过早批量生成。主图方向还没稳,就延展多张素材,会把小问题放大成一组不一致的视觉资产。
第五种失败,是让产品身份漂移。颜色、材质、比例或结构一旦和真实产品不一致,画面再好看,也不适合承担商业展示。
TouchHue 工作流适合放在哪一步
TouchHue 更适合放在“已有可用产品照,需要变成更高级商业视觉”的阶段。
推荐流程是:
- 上传一张主体相对清楚的现场产品照
- 先完成产品主体准备,确认轮廓和结构可用
- 生成第一张房间场景方向
- 用 Retouch 修正边缘、阴影、材质或局部问题
- 用 Style 调整空间气质,让画面更接近品牌需要
- 用 More Shots 延展商品页、广告和社媒需要的支持图
完整流程可以看 TouchHue 如何工作。如果你关心商品页、广告图和家具视觉素材组合,可以继续看 家具广告视觉与商品页素材。
当你手里已经有一张可用现场照,可以从 创建入口 先测试一版。需要先评估使用节奏,也可以查看 价格说明。
FAQ
展厅或仓库背景很乱,还能做高级房间图吗?
有可能。关键不是背景是否干净,而是产品主体是否完整、边缘是否可识别、材质是否还能判断。如果背景乱但产品清楚,仍然可以先进入产品准备流程。
手机拍的家具图可以用吗?
可以,但要满足基本条件:不要太糊,不要严重变形,不要裁掉关键结构,并尽量保留材质信息。手机图不一定是最终商业图,但可以成为后续场景生成的源素材。
一张现场照可以生成多张商品图吗?
可以先从一张主图方向开始。前提是产品身份足够稳定,轮廓、材质、颜色和比例在第一张结果里成立。主图稳定后,再延展多张支持图更可靠。
什么情况下应该重新拍,而不是继续修?
如果产品被大面积遮挡,关键结构缺失,材质完全看不清,或者广角变形严重,建议重新拍一张基础源图。继续修补可能会让画面变漂亮,但产品不再可信。
高级房间图能替代家具棚拍吗?
不能替代所有棚拍。它更适合扩展已有可信产品照,帮助团队更快获得商品页、广告和上新所需的视觉素材。涉及严格尺寸、结构或材料验证时,仍需要可靠的原始产品资料。